Backyard EOS – simple guide
Going to the main website which will provide a complete description of what this program does but for our intents and purposes, I will already assume that we already know the basics. ie, this is a program that enables our Canon cameras to be connected directly to the telescope allowing our laptop or pc to image the stars, capture dark frames, assist with focus, enable drift aligning, planetary imaging – this is neat as our Canon cameras video defaults to .mov mode and we need to convert this to .avi so other programs can process the data (.mov is rarely supported) – BackyardEOS captures in .avi so we no longer need to perform that conversion and I am sure a lot more in addition.
Once you purchase the program (or even begin a free 30 day evaluation), on running for the first time you need to enter a key in a box. On entering these several lines of code it will automatically populate your user information to the right hand side. That is it, you are now the registered owner.
The first screen that comes up will be this ..

You now have to connect your camera to the USB of your laptop and then select the <CONNECT> window on the top left side of the screen.
On plugging into the USB the laptop will automatically load the required device driver and upon completion the camera will be detected and the following screen will be displayed.
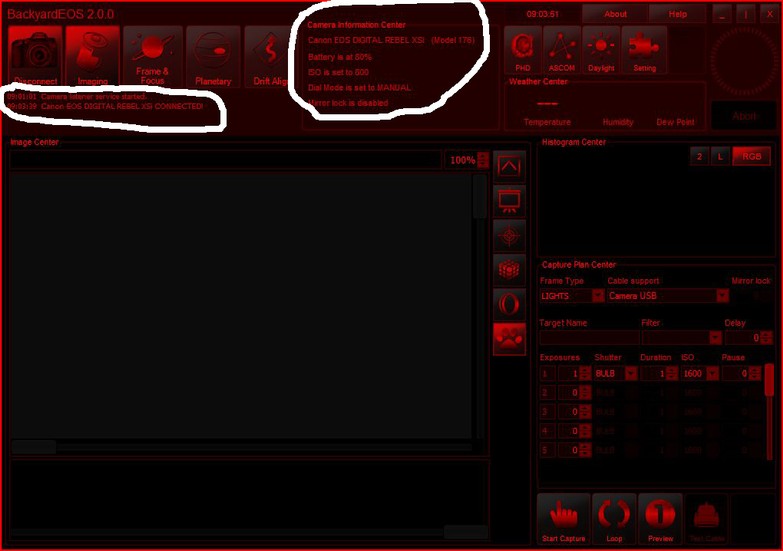
To the left it will confirm the type of camera and show this as detected.
There is also a Camera Information Center (mid screen) which you should check three important things.
The battery is at 80% (this will reduce over time so keep an eye on it)
The ISO is set to 800 (make sure that the images and darks you take are all at the same iso)
The Dial Mode is set to MANUAL (yes keep it there)
Now on startup the program has some defaults which I needed to change.
Firstly, the default download folder needs to be in a better place for me.
Secondly, the images are captured to laptop only by default (and none saved on the camera card)
Thirdly, only raw files are kept – you might want to capture jpegs also so you can look through the images you have collected quicker and discard the crap ones. Raw files might take a while to load unless you have other software such as Photo Mechanic.
So, to change this then select the <SETTINGS> window top right and you will get a display similar to the image below.
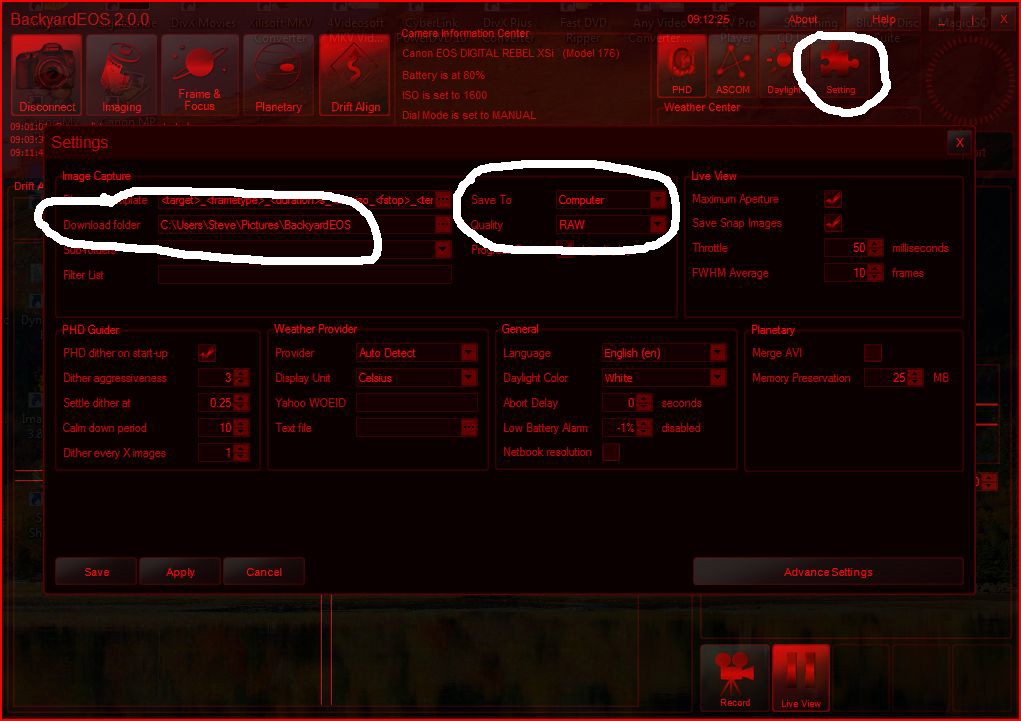
Then change those hilighted areas above to what you would like (that is, if you should want to change them – it is all down to personal preference.)
If so you will have something similar to this …
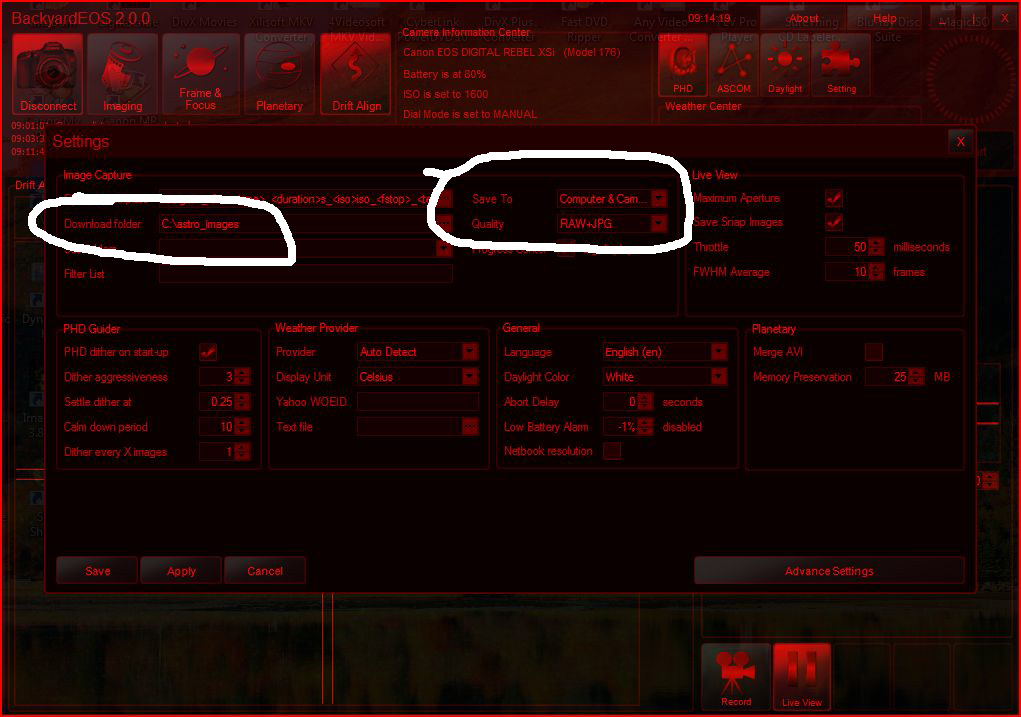
Select <Settings tab> > Sub-folder < – DATE style, this will create a folder in your default folder with the Date and Image name.
The next thing we want to do before anything else is to ensure we have good focus.
Select the <FRAME & FOCUS> window on the top left.
This will display the following screen.
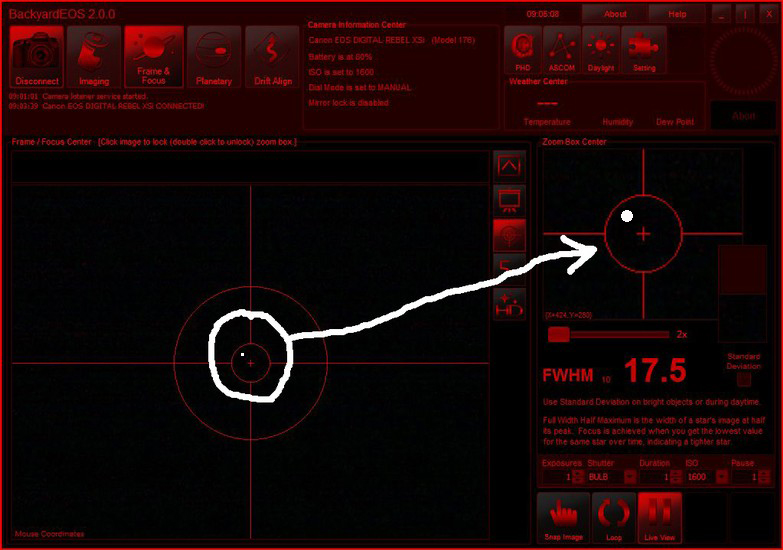
IMPORTANT: The first time you use this, you must set your liveview on within the camera menu. Afterwards I have found it automatically turns itelf on/off.
Note: The two areas I have marked, the smaller one on the right is a zoomed in portion from the main window. These windows I also use for star alignment after I have polar aligned – they are incredibly accurate – more so than the illuminated reticule eyepiece.
I then pick a bright star – not sure if Vega is the best example to use and use the slider in the image below while looking at the “zoomed” in portion to give you a good size star to observe.
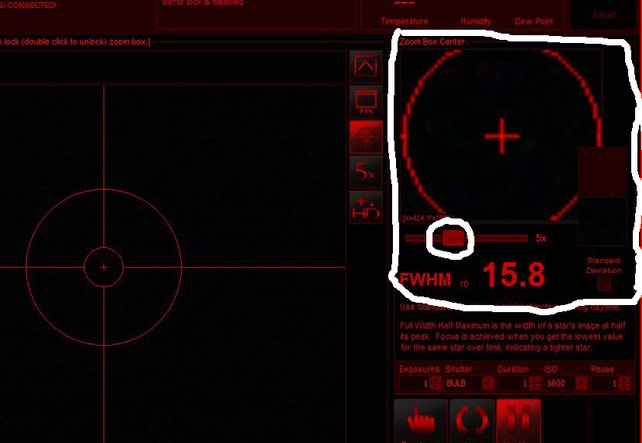
Adjust the focus each way as you are aiming for the lowest FWHM value – it will not necessarily go to zero, you are just after the lowest number. Bigger/brighter stars have higher numbers. If you have a Bahtinov mask then put it onto your scope now and tune for the diffraction spikes – you have to be absolutely spot on. Now I found that I could not see any diffraction spikes while looking at Vega and instead tuned to the lowest FWHM value which seemed perfect. It may have been worth bumping up the ISO level to get a brighter image to work on.
Once you are happy with the focussing, if your scope has it then tighten the focus lock screw.
IMPORTANT: Very important – turn your Liveview off if you have it prior to imaging and cover up the viewfinder to stop stray light from entering (that rubber thing on your camera strap should fit).
Imaging time !!!! Select the <IMAGING> window top left and you will get the following screen.
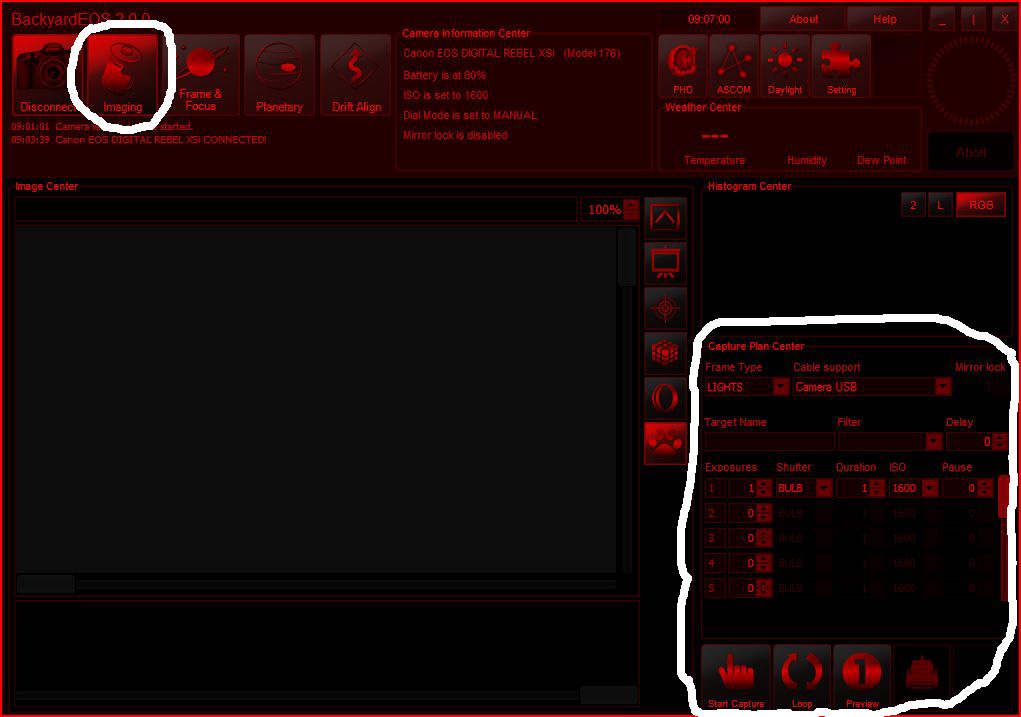
Aside from the battery level and iso level area that I mentioned earlier, you are really concentrating on the lower right part of the screen. There is a wealth of information here and it is relatively straightforward.
This area is known as the “Capture Plan Center” and we will go through it step by step.
Frame type: LIGHTS, DARKS, FLATS, DARK FLATS and BIAS (all options that we have gone through already on the previous tutorial) What this does is include this frame type within your named capture – very very useful.
IMPORTANT: They are only names but do check you have assigned the correct frame type as it will make life so much easier when it comes to processing later.
Camera USB: leave as is
Mirror Lock: leave as is – unless you have the special cable required
Target Name: Freeflow typing here – Andromeda Galaxy or M31 or whatever, again your filename will begin with this name.
Filter: Freeflow typing here – I have a clip filter installed so I typed CLS
Delay: dunno what this does !
Now the meaty bit – your work flow !!!
IMPORTANT: You can do all your subs (lights) – or indeed darks in a work flow then pop inside and grab a coffee then return later to check battery status/sensor temperature etc. It will actually tell you what time the workflow will end – but that will mean two runs – one for lights then return to put telescope cap on and then do the set for darks !
Before I start I need to decide what frame type I am doing and I will be changing the following drop down windows.
Exposures: how many you want to take
Shutter: always leave as is (BULB)
Duration: in seconds
ISO: 800 or 1600 are probably the only two you should consider
Pause: in seconds – time to let your sensor cool down – 10 to 20 seconds is best.
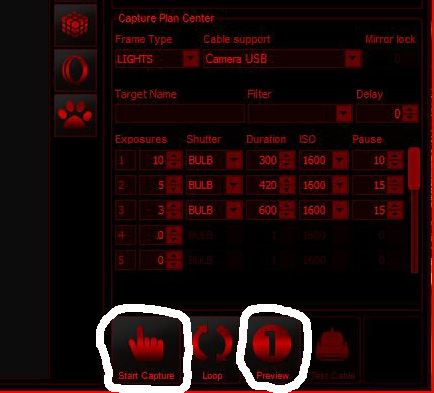
So, in the following example, I am going to capture LIGHTS at ISO1600 and the workflow will be as follows:
10 exposures at 300 seconds with a 10 second pause between each capture
then
5 exposures at 420 seconds with a 15 second pause between each capture
then
3 exposures at 600 seconds with a 15 second pause between each capture
To begin the capture hit <START> and also the <PREVIEW> (the preview will update the screen after each capture)
This is the screen setup for the above.
If you have messed up, don’t panic there is an <ABORT> button top right, change what you need then hit <START CAPTURE> again.
A filename will be created with all that information embedded and will look something similar to this:
ANDROMEDA_LIGHT_300s_1600iso_+12c_CLS_059stdev_20111028-21h43m05s860ms
The filename is fairly self explanatory, one extra thing to note is the +12c that is the temperature of the camera sensor and you want that as low as possible. Heat = noise and we don’t want no stinky noise !!!
On the main page you can also select <WEATHER> and have the local weather info populate the screen. You will need a WiFi connection for this. Point the weather provider as YAHOO then go to Yahoo’s weather site and grab the WOEID for your location. This will help you monitor temperature and more importantly the dew point.
I hope this helps 🙂