DeepSky Stacker – simple guide
This is a basic tutorial to enable you to create a .tif file containing as much image information as possible from a stacked set of raw images. This will then be processed using follow on software such as Adobe Photoshop, Adobe Lightroom, Imagesplus, Gimp etc.
Before starting this tutorial it is assumed you already have created a set of subs/lights and calibration frames (Dark Frames, Flat Frames, Bias Frames and even Dark Flat frames). Better still you you may even have created a library of these on your computer. If that is the case, DSS can actually remember the paths to these files and the only thing you will have to change are the paths for the different object folders and the times folders so that they all correspond.
This is how my hard drive is set up complete with a temporary folder.
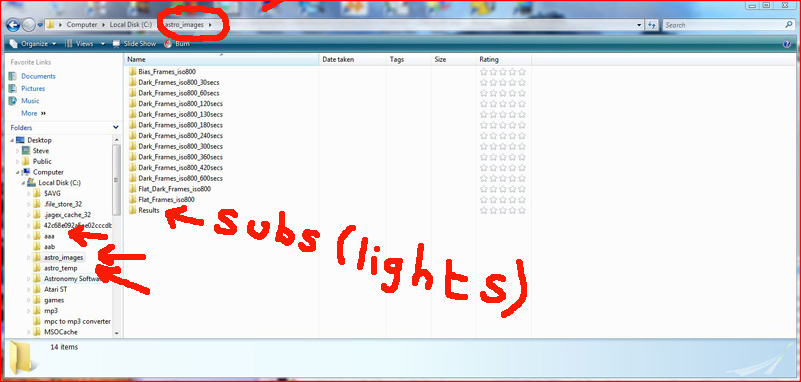

aaa = DSS output file folder
astro_temp = folder for temporary files
Results = contain the subs all in seperate folders by Object or NGC or IC names
Ok, with all the preparatory work done, time to fire up the beastie.
Running the program comes up with the following screen …
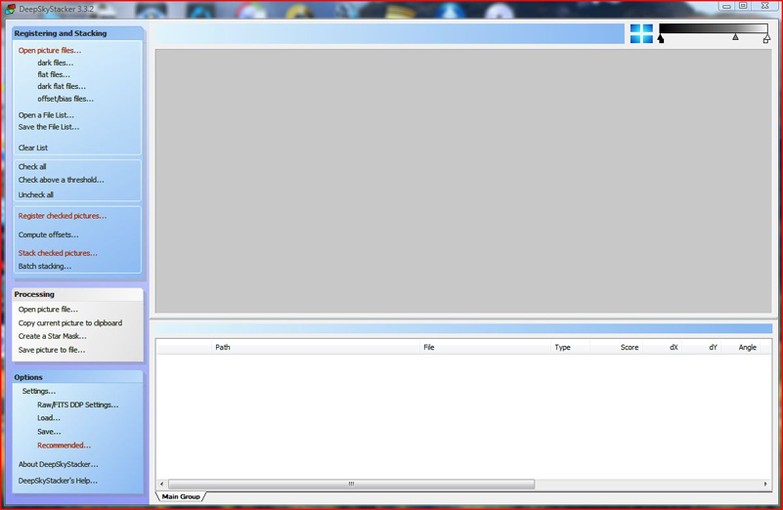

First thing we want to do is to set some parameters and paths up.
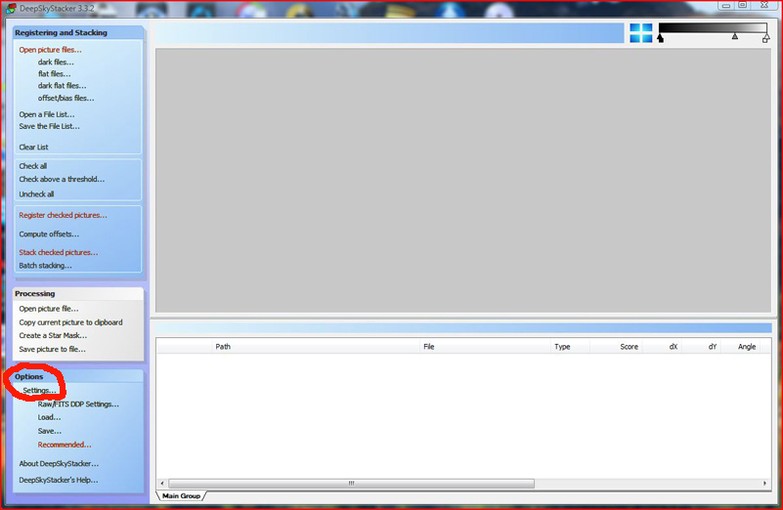

Select <Settings> and you are given two choices. Register Settings and Stacking Settings.
Register Settings we will come to later so select Stacking Settings …
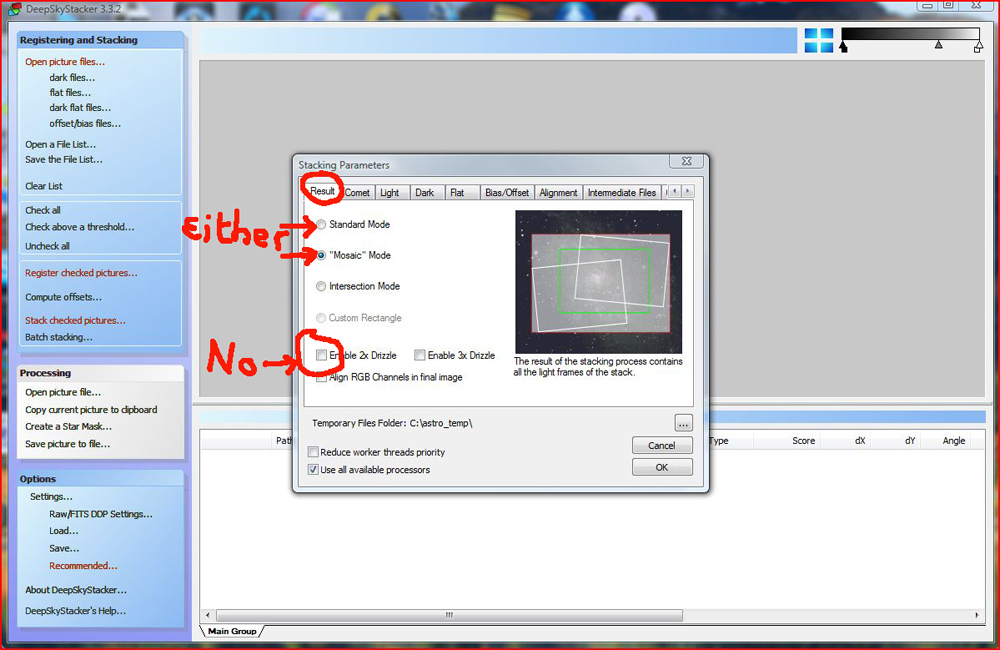

The first screen will show the <Result> tab.
I have seen different guides show different approaches and either Standard or Mosaic are good. These two approaches relate to how the light frames are stacked. I chose Mosaic.
Enabling 2x Drizzle will give better quality results but 9x out of 10 it will crash the program. You see, DSS at the moment is 32bit and not 64bit and runs out of memory quickly. If you have a lot of files to stack DSS will fail and fail often. I have a quad core processor running 8gigs of high speed ram and still have to turn Drizzle off.
Ok on to the <Light> tab.
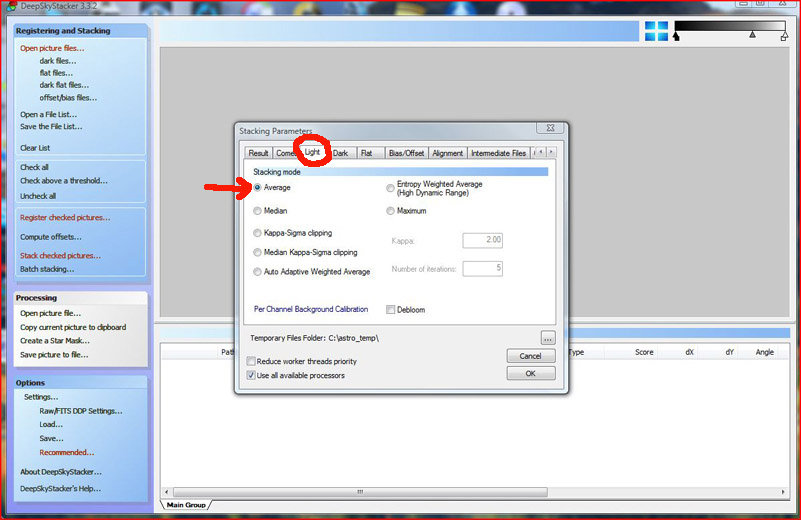

Select <Average> for the stacking parameters
If you browse the internet for image examples, in some cases it will tell you how these are stacked, Average, Median, Kapa-Sigma etc. The stacking process might differ depending if you are stacking Nebulas, Galaxies or Clusters.
Ok on to the <Dark> tab.
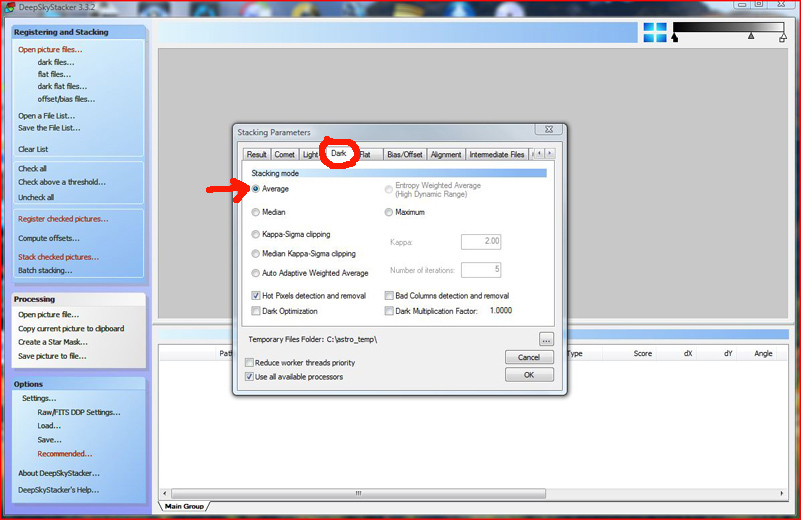

Again, as before select <Average> and leave everything else as is.
Ok on to the <Flat> tab.
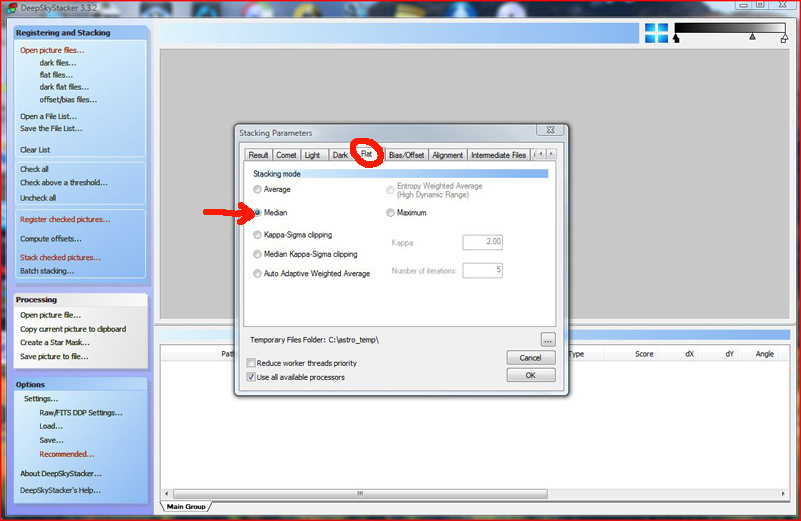

This time we have selected <Median> after trolling through lots of images on the internet I have seen this option checked more often than not.
Ok on to the <Bias/Offset> tab.
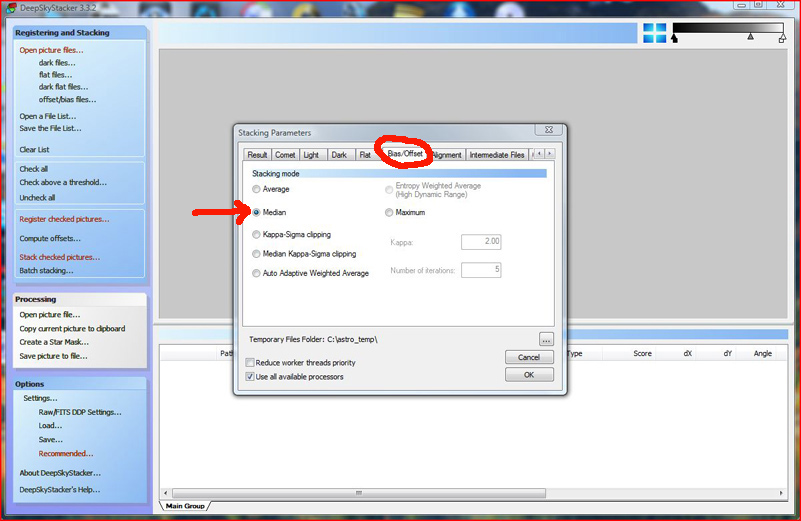

Again, as before select <Median> and leave everything else as is.
Ok on to the <Alignment> tab.
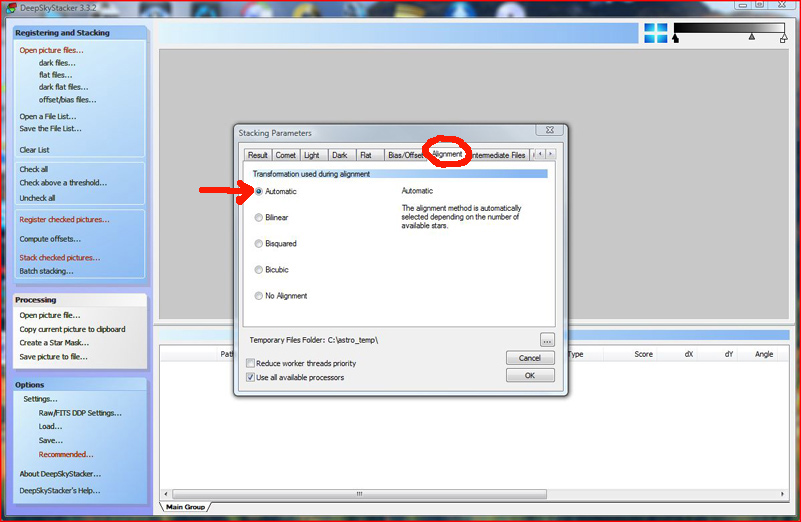

Set this to <Automatic> there may be some variations to this rule but this default works well.
Now top right adjacent to the Intermediate files are < and > select > and go all the way over to the right and select the <Output> tab.
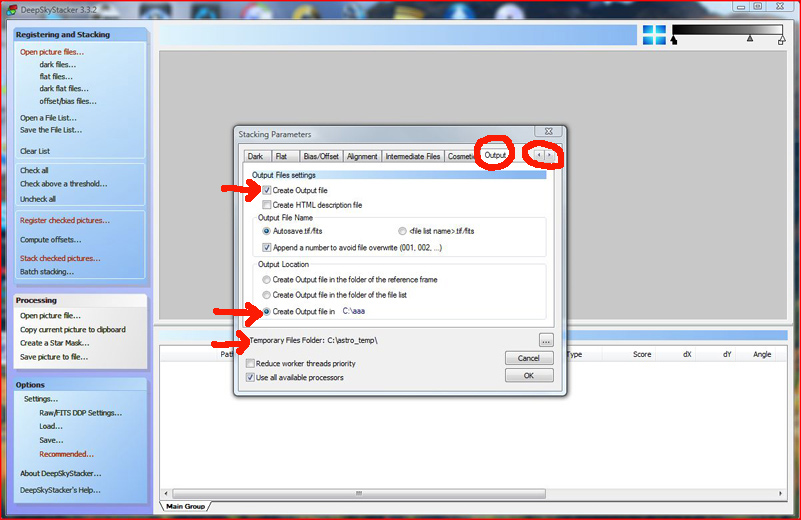

This area is all down to personal choice and relates to the directory area I referred to earlier. Obviously you would want to create an output file so check that box. I left the file naming convention as is.
Also choose an Output Location, in my case I selected c: (why do you ask ? aaa alphabetically will be the first folder when I select My Computer).
You can also set a Temporary Files Folder, in my case C:_temp\par
Ok everything is now set, time to start feeding the machine ….
Click <Ok> to close that tab and return to the main screen.
Top left, select the Open Picture Files… (hilighted in red)
That will bring up the following screen ….
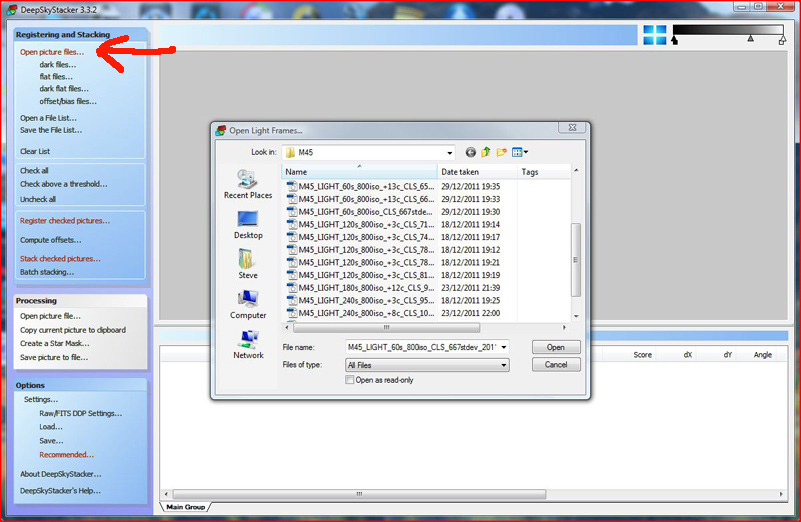

Now this will be looking for a directory that your subs/lights are contained in and you will have to tell it the path. In this case, my path is c:_images (I am a tidy git I suppose !)
Now look at the file names – these were created by BackyardEOS and have a wealth of information that is immediately obvious. Target>LIGHT frame>duration in seconds>ISO>sensor temperature>ClipFilter>date/time Your subs might not have the same level of information but you MUST be able to identify different exposure light frames so you can correctly match it with the appropriate Dark Frame.
With me so far ? Ok, onwards we go …
Select a portion of images – I try “if possible” to get a portion on the same date/similar time so the images are in the same orientation and this will make stacking and registering a lot easier (and of course better results).
So you have held the shift key dragged the mouse down and selected. Hit <Ok>.
This will now take you to the following screen …
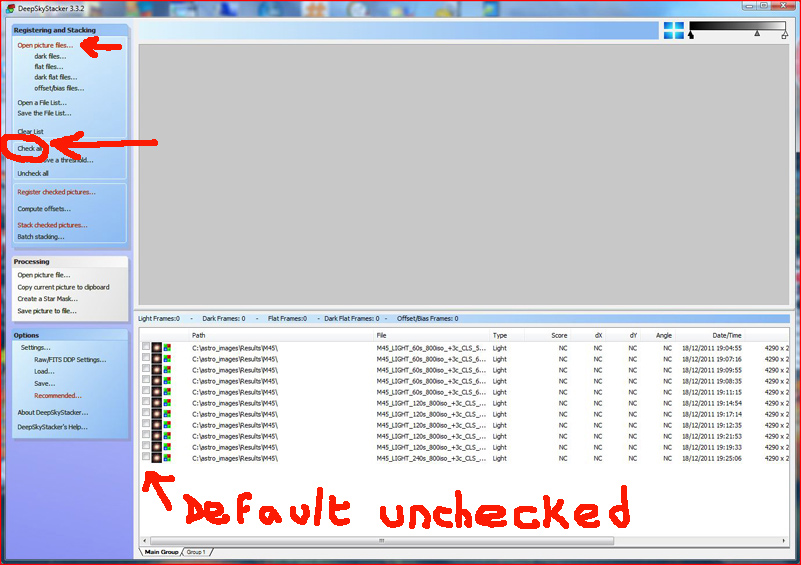

Hmmm light frames have been chosen but the default leaves them all unchecked. Why you may ask, well you can perform quality checks later and obtain a score then only select the frames that have a good score. However, I have actually gone through all the raw files before firing up DSS and already removed the bad images. Note: it is absolutely pointless to include poor images as they will drag down the quality of the finished picture.
Ok, top left now select <dark files …> and the following window pops up …
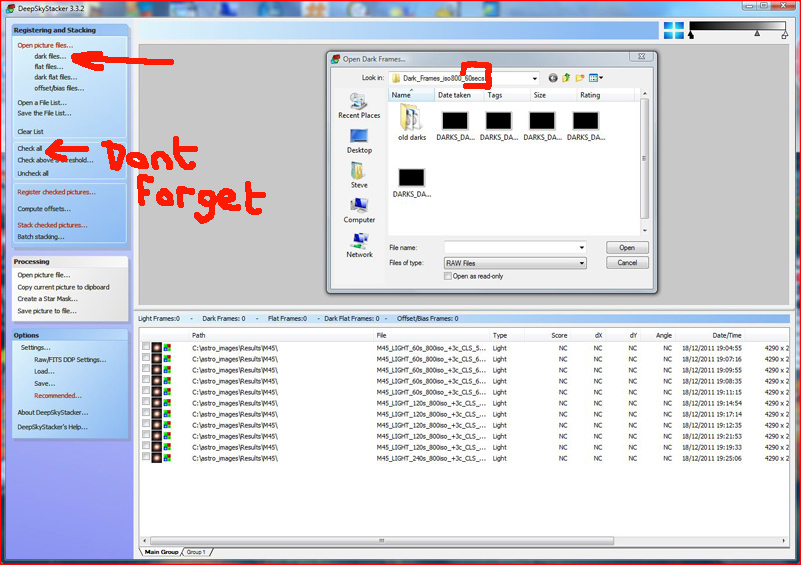

Before we go any further, make sure you select all your light frames. So, on the menu bar to the left select <Check all>…
Now select some dark frames – the amount usually depends on how many subs/lights you have already selected. Note: the dark frames will remember the last folder it was in so I have named all my folders with the time in seconds. You will have to change directory to select darks in each of the time settings you have lights in. For example, I have lights taken in 60s, 120s and 240s so I will need three sets of darks in the correct time duration to match.
The picture below should help explain that last sentence…
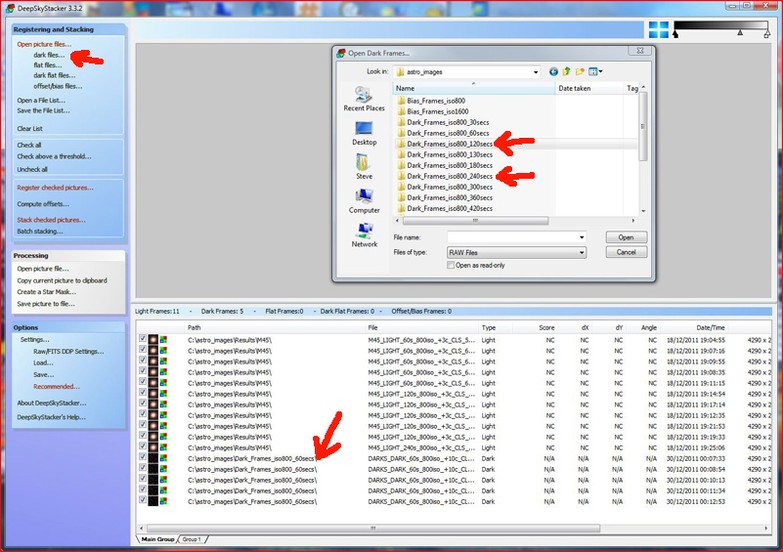

Now it must be said that the “proper” way to deal with Darks is not to use a library and instead, run dark frames immediately following the lights so the temperature, camera orientation and focus are exactly the same as set for your lights capture. I would like at some point to conduct a test between library darks and darks done on the same evening and see how much of a difference the two ways make. Another good thing about BYEos is that it will name both the light frame and dark frame with the temperature at time of exposure. In the above example the lights were +3 degrees and the darks +10 degrees so quite a difference – something to take into account !
Ok, now a selection of darks from the library in each of those three exposures have now been added to the flow it is time to select some flats.
Ok, top left now select <flat files …> and the following window pops up …
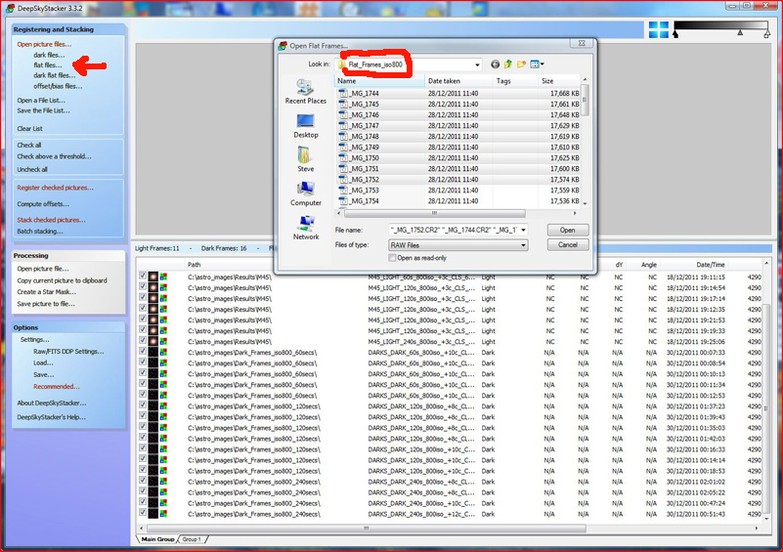

Same idea as last time and again the program will remember this path – which is great if you only shoot in say ISO800 but if you also have flats in ISO1600 you will have to be aware of this and remember to change folders. You can now actually see the list of files in the workflow … Light Frames 11, Dark Frames 16 … this is only a demo run because the dark frames should be around double.
Ok, a liberal sprinkling of flats says the recipe and then on to the next picture …
Ok, top left now select <dark flat files …> and the following window pops up …
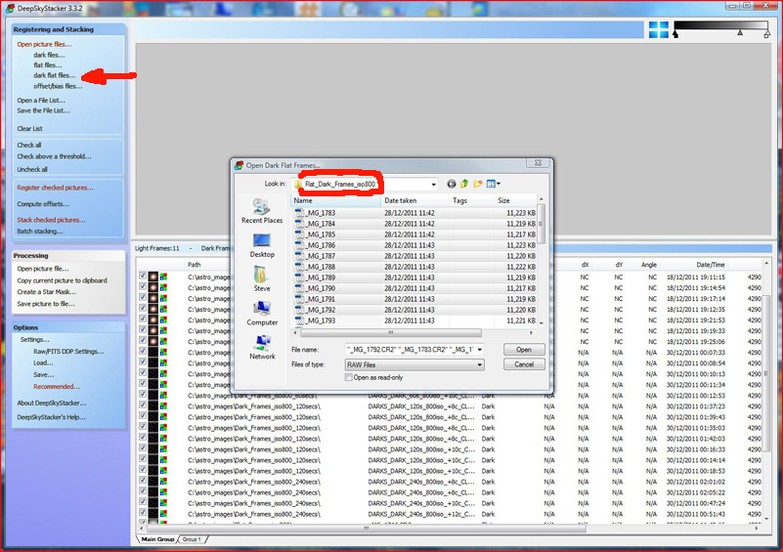

Exactly the same idea as the flats and again, the amount depending on how many lights you have originally selected.
Now there are two trains of thought here, do you need Bias frames if you use Dark Flats and vice versa. DSS is receptive to both and under Register Checked Pictures tab if both Dark Flats and Bias Frames are selected then the window is green. If one of those sets is not included the window goes yellow. Some could argue you are calibrating the image twice and maybe you would lose some detail. I am open to suggestions on that front !
However, for completeness, we will also add some Bias frames to the mixing bowl !
Ok, top left now select <offset/bias files …> and the following window pops up …
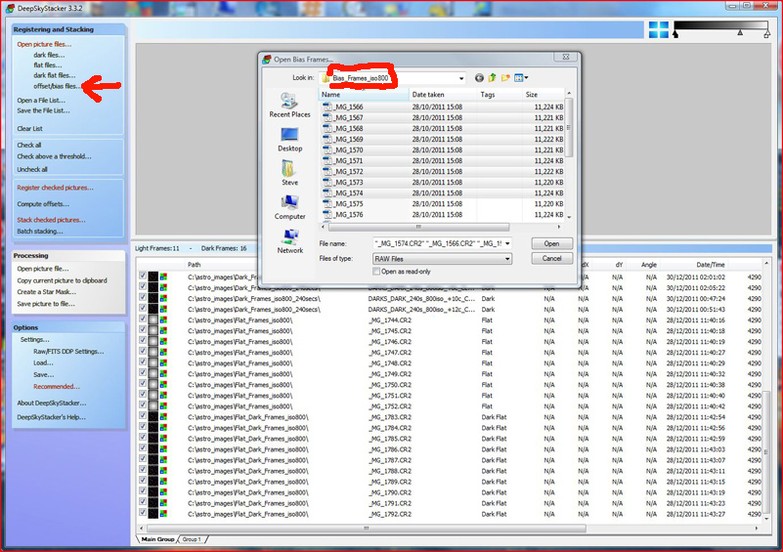

And again, exactly the same idea as the Flats and Dark Flat frames, the amount depending on how many lights you have originally selected.
One final check ….
You have Checked all files
The list of files in the blue area look complete: light frames 11 – dark frames 16 – flat frames 9 – dark flat frames 10 – offset/bias frames 9
Ok now you are getting ready to rumble …
Select <Register checked pictures …> and the following window pops up …
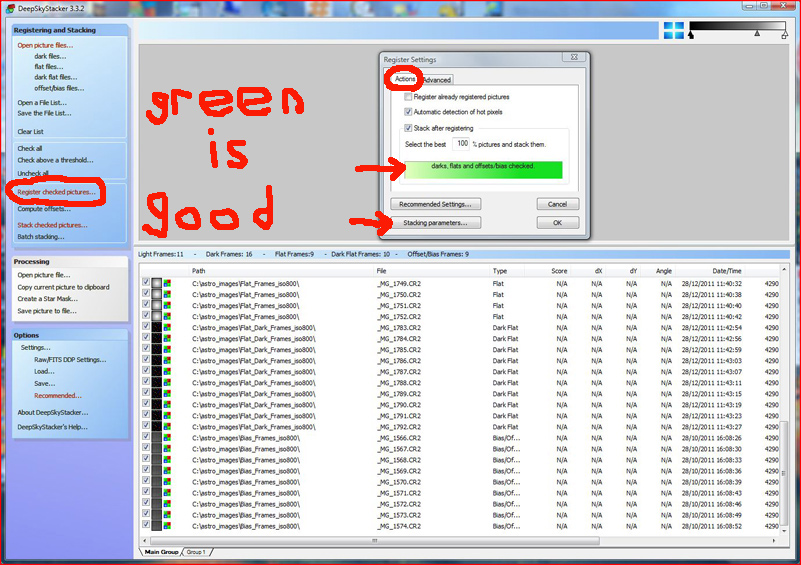

Remember the green/yellow window I mentioned earlier. This is it.
The Stacking parameters box has already been setup, you did this right at the beginning.
The rest of the settings under this <Actions> tab should be setup as displayed. You can reduce the Select the best 100% but only if your images are less than perfect yet you still want a result.
Next select <Advanced> tab and the following window pops up …
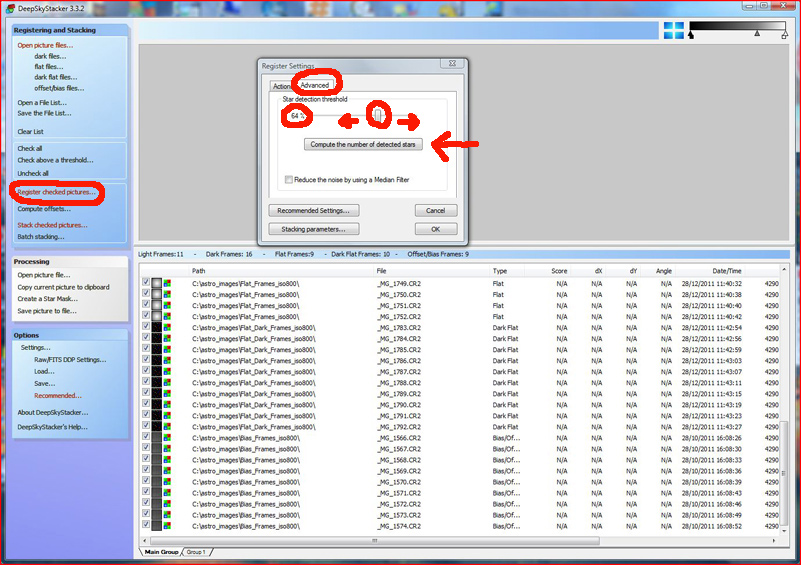

This is a quick test the program runs to detect the quality of your images by performing a “star count” and the idea is to select Compute the number of detected stars and see what result is returned. There is a slider to move and the ideal number to get is around 50. This part is very important and I believe sets the baseline for processing algorithms. The lower this slider goes to increase the star count could suggest a lower quality but I have had reasonable results from 12% oh and rubbish results from 6%.
On to the next picture …
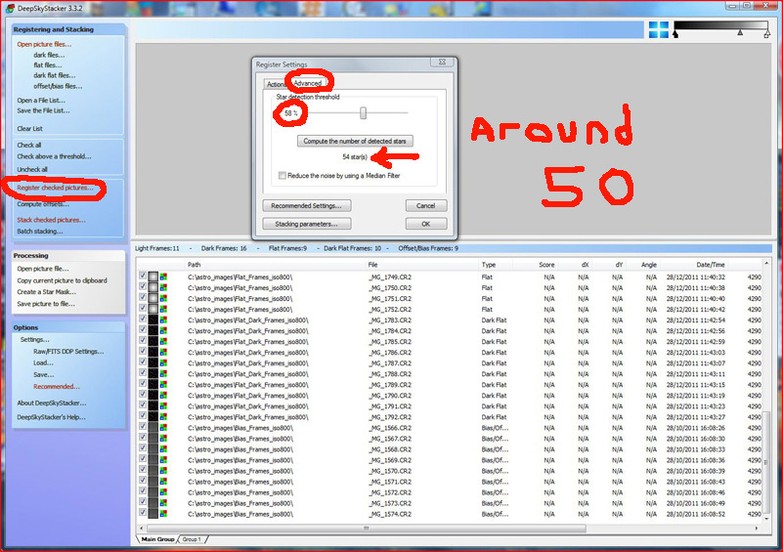

Wow 58%, very nice – that should do ok.
Ok, now to look at the <recommended settings> area …
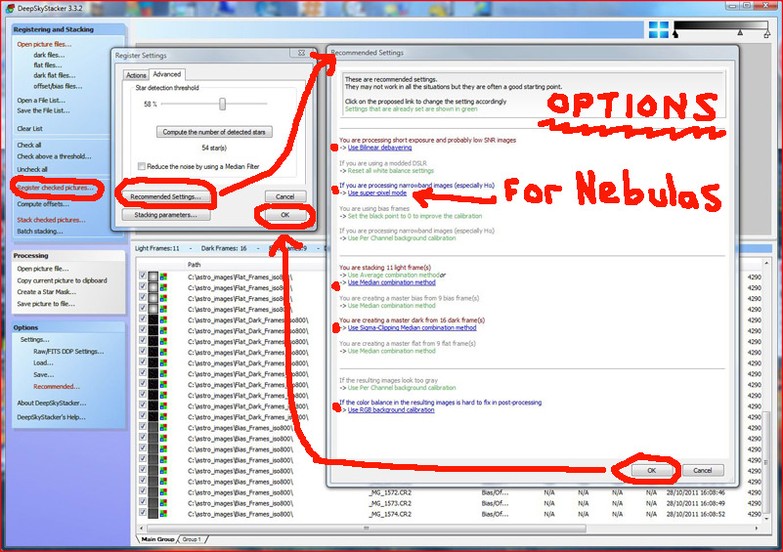

Lots of different options to choose from here between the green and blue. You could leave them exactly as is but I would look at one choice inparticular. If you are processing Ha (nebulas) then I would consider selecting this option.
Hit <Ok> when done and the processing will run.
Now this can take quite a long while depending on how fast your computer is.
…. Coffee time ….
Once completed a potential image emerges …
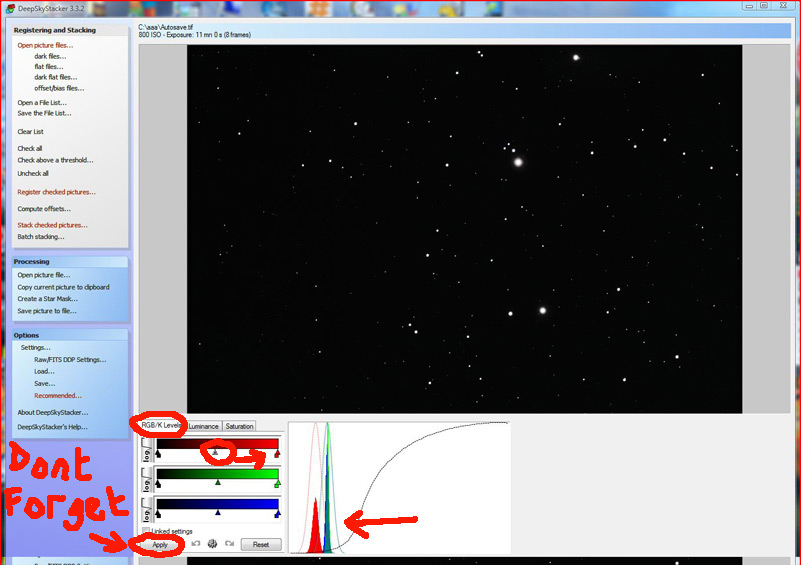

This screen is not too frightening but you can do a lot of damage to your final image – so small steps Elly, small steps !!
First thing to notice is your RGB/K Levels.
You have 3 sliders and these are used to move the individual levels.
Ideally, you want all three spikes on top of each other. You will see in this case that the RED is slightly to the left. In this case, make sure the <Linked settings> is unchecked or you would be moving all three channels together. Then select the centre triangle on RED and move it slowly to the right – you will notice when it moves.
When you are happy hit <Apply>
You should have a screen looking something like this …
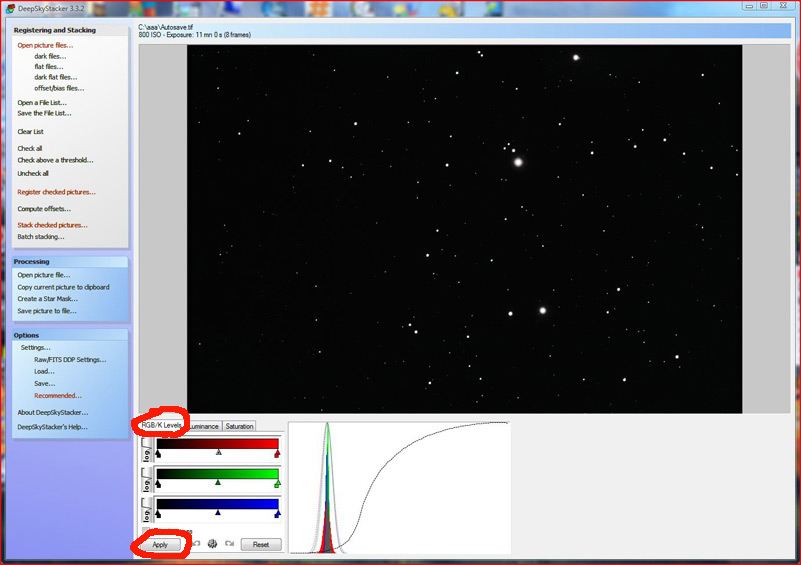

Ok, in my example I chose Pleiades – perhaps not the ideal target as an example but we will have a go at some colour next so on that tab with RGB/K Levels, select <Saturation>
You should have a screen looking something like this …
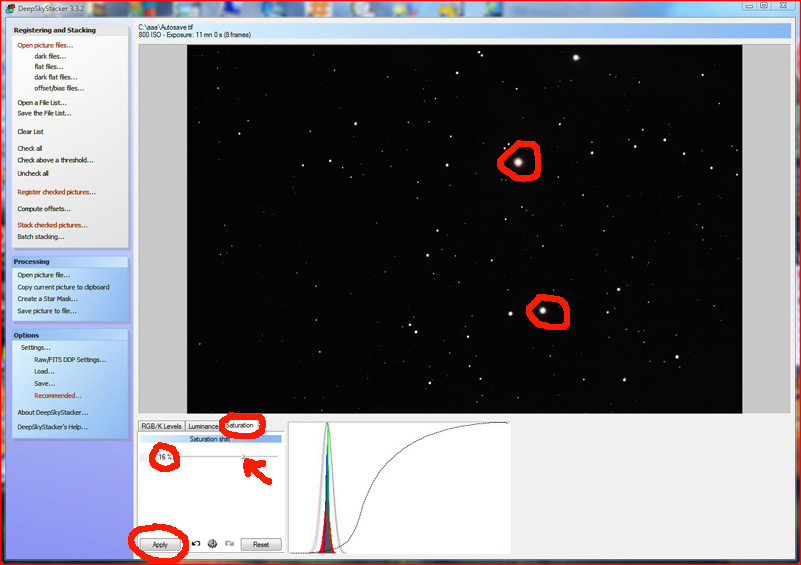

Now play with this very carefully as you can “over-cook” your image easily. I warmed mine up to around 16% and that does seem to be a common number. You will see a little bit of colour around the stars – if this was a nebula you would see some red colour appearing.
Remember to hit <Apply> to see the results
Next, on the same tab select <Luminance> …
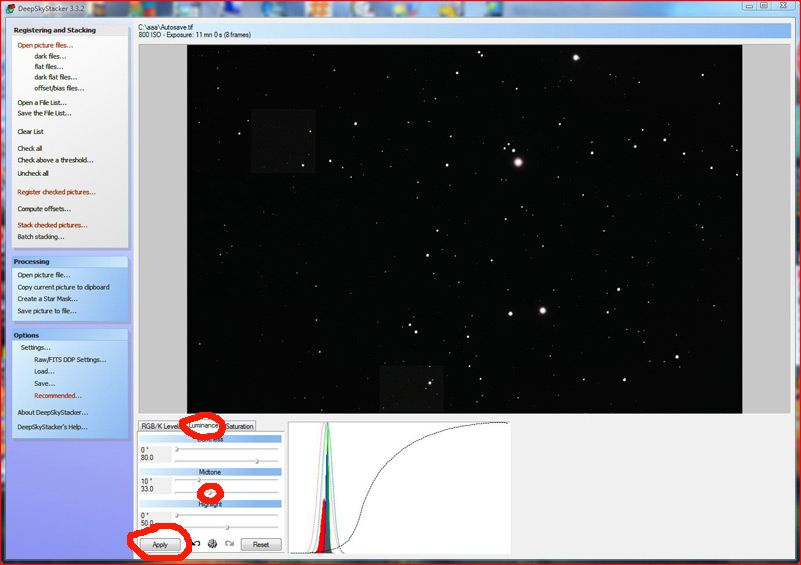

Now this is very sensitive and I would only suggest moving the midtone slider as indicated above and in very small amounts – remember to hit <Apply> to see the changes you have made.
I have purposely over emphasised the Midtone to show you halos around the stars in the image below…
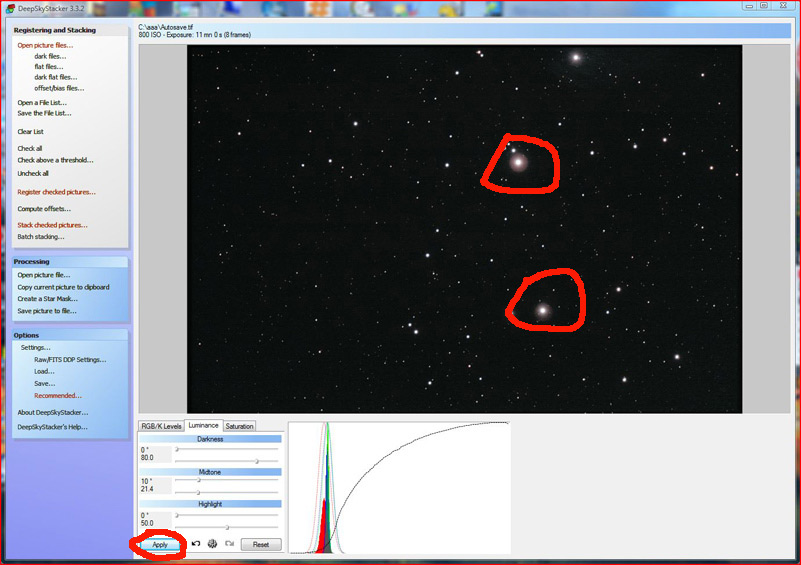

Once you are happy with the result it is time to output the file. Remember, you are only “preparing” an image that will be further processed by Photoshop or other image editing program. What you are doing is making sure that the image is the best it can possibly be at this point (not under/over exposed, lots of detail, stars reasonably shaped). Remember, Galaxies and Nebula have a lot of “hidden” detail that will not be seen at this point and that image detail is still contained within this very large .tif file that this program creates.
Time to ouput that picture file …
Now select under Processing, Save picture to file… and the following window will pop up.
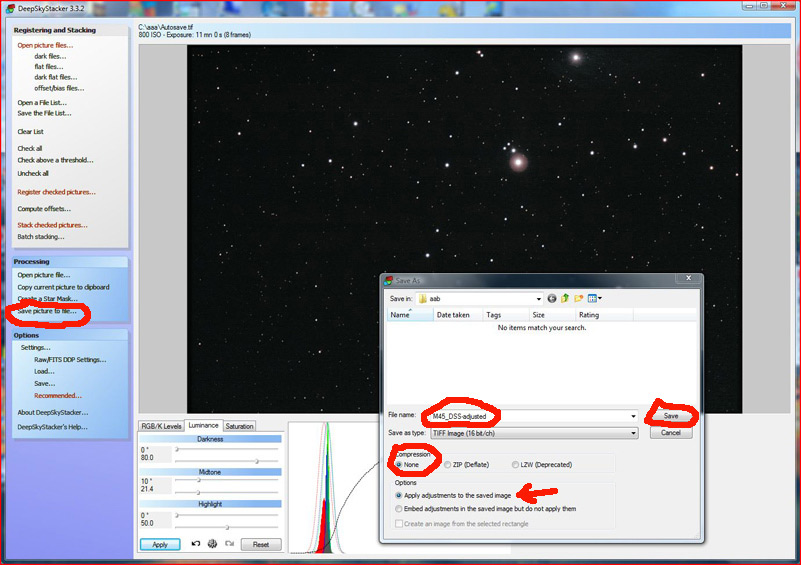

Give the image a filename – careful not to overwrite a file you may have already saved.
Compression should be NONE
And don’t forget to Apply adjustments to the saved image or that last 5 slides work would have been in vain.
Hit save and an .tif image will be created within the folder you specified earlier.
Now the work really begins in how to get the best out of that .tif file, but that will be for another day